
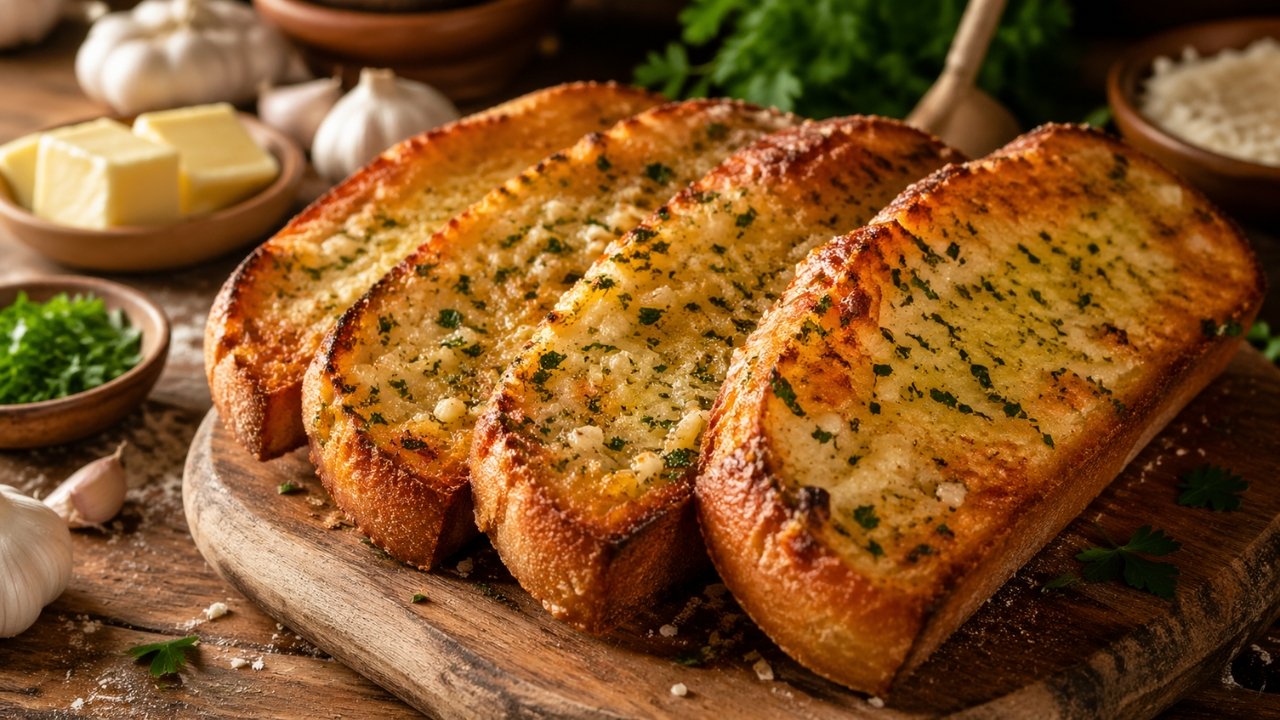
There are recipes that arrive at the table quietly, and then there is garlic bread: warm, aromatic, deeply golden at the edges, and impossible to ignore. This version is built around one simple chef’s habit: after the first generous spread of garlic butter sinks into the bread, I add one extra layer on top. That second layer is what gives the surface its glossy, bronzed finish and the kind of fragrance that pulls everyone toward the kitchen before the main course has even been served.
The pleasure of good garlic bread is in contrast. The crust should crackle lightly under the knife, the center should remain tender and buttery, and the garlic should taste mellow and rounded, never harsh. A little parsley brings freshness, a touch of Parmesan adds savory depth, and the final heat of the oven turns everything into a bubbling, fragrant topping.
This is a simple recipe, but it rewards care. Use a sturdy loaf, soften the butter properly, and season with confidence. Served alongside pasta, roasted chicken, soup, or a tray of grilled vegetables, this garlic bread has the rare gift of feeling both casual and luxurious.

Recipe Information
- Recipe Name: Garlic Bread with an Extra Golden Garlic Butter Layer
- Description: A crisp, buttery, fragrant garlic bread finished with a second layer of seasoned garlic butter for a deeply golden top and soft, savory center.
- Servings: 6 servings
- Preparation Time: 12 minutes
- Cooking Time: 10 minutes
- Total Time: 22 minutes
- Difficulty: Easy
- Recipe Category: Bread, Side Dish, Appetizer
- Cuisine: Italian-inspired
Ingredients
For the bread
- 1 large baguette or Italian loaf, about 350 to 400 g
- 115 g unsalted butter, softened
- 2 tablespoons extra virgin olive oil
- 5 large garlic cloves, finely grated or crushed
- 2 tablespoons finely chopped fresh parsley
- 2 tablespoons finely grated Parmesan cheese
- 1 teaspoon flaky sea salt, or to taste
- 1/4 teaspoon freshly ground black pepper
- 1/4 teaspoon dried oregano
- Pinch of red pepper flakes, optional
For the extra golden layer
- 2 tablespoons softened butter
- 1 tablespoon finely grated Parmesan cheese
- 1 teaspoon chopped parsley
- Small pinch of salt
Kitchen Tools
- Bread knife
- Small mixing bowl
- Fork or spatula
- Microplane or garlic press
- Baking tray
- Parchment paper
- Small offset spatula or butter knife
Preparation
Preparing the garlic butter
- Soften the butter properly: The butter should be soft enough to spread easily, but not melted. This matters because softened butter holds the garlic, herbs, salt, and cheese evenly, giving every bite the same rich flavor.
- In a small bowl, combine the softened butter, olive oil, grated garlic, parsley, Parmesan, salt, black pepper, oregano, and red pepper flakes if using. Mix until smooth and fragrant. The olive oil loosens the butter slightly, helping it sink into the bread while keeping the finished texture lush rather than heavy.
- Tip: Grating the garlic gives a more elegant result than chopping. It melts into the butter and perfumes the bread evenly, without leaving sharp raw pieces behind.
Cutting and spreading the bread
- Preheat the oven to 220°C. Line a baking tray with parchment paper. Slice the baguette or loaf in half lengthwise, keeping the two long pieces even so they toast at the same rate.
- Place the bread cut-side up on the prepared tray. Spread the first layer of garlic butter from edge to edge, paying special attention to the corners, where the bread can dry out quickly.
- Texture check: The bread should look generously coated, but not drowned. You want enough butter to seep into the crumb while leaving a visible layer on the surface.
Adding the extra golden layer
- In a second small bowl, mix the extra softened butter with Parmesan, parsley, and a small pinch of salt. This is the finishing layer that gives the top its golden, fragrant character.
- Spread this second mixture lightly over the already buttered bread. Do not press too firmly; let it sit on the surface. As it bakes, it will bubble, brown, and create a delicate savory crust.
- Important: This extra layer is not about adding heaviness. It is about creating a glossy, flavorful top that catches the heat of the oven and turns beautifully golden.
Baking and finishing
- Bake the garlic bread for 8 to 10 minutes, until the edges are crisp and the butter is sizzling gently. For a deeper golden finish, place it under the grill or broiler for 1 minute, watching carefully.
- Remove from the oven and let it stand for 1 minute before slicing. This short pause allows the butter to settle back into the crumb while the surface remains crisp.
- Slice into generous pieces and serve immediately, while the aroma is at its fullest and the texture is still warm, crisp, and tender.
Serving Suggestions
Serve this garlic bread straight from the oven, arranged on a warm platter with the cut sides facing up so the golden top remains visible. It is particularly good beside tomato-based pasta, creamy soups, roast chicken, grilled prawns, or a simple green salad dressed with lemon and olive oil.
For a more elegant presentation, cut the loaf into long angled pieces and finish with a light scattering of fresh parsley and a little extra Parmesan. The bread should be served warm, not hot enough to burn the palate, but still fragrant enough for the garlic butter to feel silky and aromatic.
Chef Tips
Choose the right bread
A baguette gives crispness and elegance, while an Italian loaf offers a softer, more generous bite. Avoid very airy bread with large holes, as the butter can slip through rather than settling into the crumb.
Balance the garlic
Fresh garlic is essential, but it should be treated with care. Finely grating it allows the flavor to bloom evenly in the butter. If you prefer a softer garlic note, warm the garlic gently in the olive oil for 30 seconds before mixing it into the butter.
Do not skip the second layer
The second spread is what makes this recipe distinctive. It creates a burnished top, a deeper aroma, and that irresistible first impression when the bread comes out of the oven.
Storage and Make-Ahead Tips
Garlic bread is best eaten freshly baked, but it can be prepared ahead. Spread the first garlic butter layer over the cut bread, cover loosely, and refrigerate for up to 24 hours. Add the extra golden layer just before baking for the best texture and color.
Leftovers can be wrapped and refrigerated for up to 2 days. Reheat in a 180°C oven for 6 to 8 minutes until warmed through and lightly crisp again. Avoid microwaving if possible, as it softens the crust and dulls the buttery surface.
For freezing, prepare the bread with the first layer of garlic butter only, wrap tightly, and freeze for up to 1 month. Bake from frozen at 200°C, then add the final butter layer during the last few minutes so the top still turns golden and fragrant.
Additional Information
Garlic bread, as many of us know it, is deeply connected to Italian-American cooking, where crusty bread, garlic, butter, olive oil, and herbs became a beloved companion to pasta and hearty family meals. Its spirit, however, reaches further back to the Mediterranean tradition of rubbing warm bread with garlic and olive oil, a simple act that turns humble ingredients into something memorable.
This version honors that tradition while leaning into a chef’s small finishing detail. The extra layer on top is not complicated, but it changes the experience. It gives the bread a polished, restaurant-style finish: golden at the edges, aromatic through the center, and rich without feeling excessive. It is the kind of recipe that proves a little precision can make even the simplest bread feel special.
