
There is a quiet art to excellent nachos. The difference between a platter that collapses into a soggy heap and one that stays crisp, generous, and deeply satisfying is not extravagance; it is order. With loaded nachos, every chip should earn its place: sturdy enough to hold toppings, warm enough to melt cheese, and finished with enough freshness to keep each bite bright.
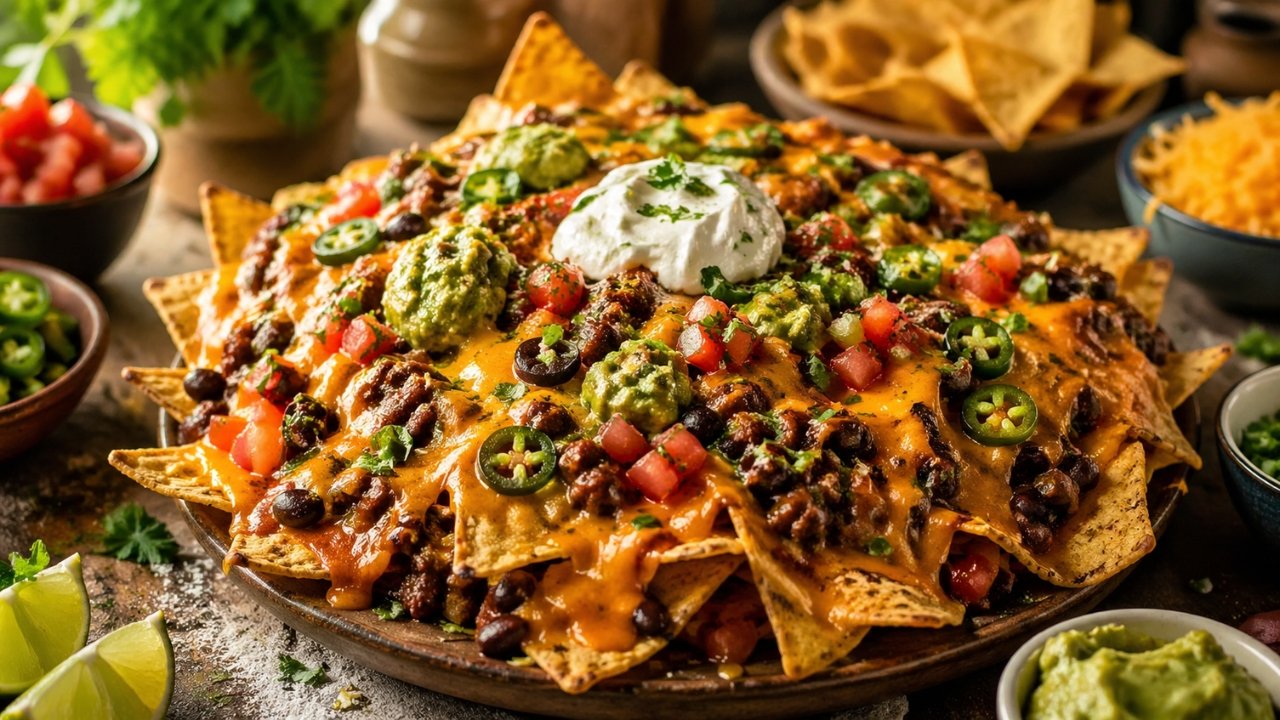
This version is built with a chef’s eye for texture. The cheese goes in contact with the chips first, creating a delicious barrier and a molten base. Warm toppings are layered with restraint, then the cool garnishes arrive only after the tray leaves the oven. The result is crisp at the edges, melty in the middle, and balanced rather than heavy.

It is the kind of dish made for a casual table, but it deserves care. Serve it straight from the pan, with lime wedges nearby and a few extra napkins within reach. These loaded nachos are relaxed, confident, and precisely the sort of food people gather around without needing an invitation twice.

Recipe Information
- Recipe Name: Loaded Nachos
- Description: Crisp tortilla chips layered in a smarter order with cheese, seasoned beans, jalapeños, tomatoes, avocado, sour cream, and fresh cilantro for a fast, melty, crowd-pleasing nacho platter.
- Servings: 4 generous servings
- Preparation Time: 4 minutes
- Cooking Time: 6 minutes
- Total Time: 10 minutes
- Difficulty: Easy
- Recipe Category: Appetizer, snack, casual main
- Cuisine: Tex-Mex inspired
Ingredients
For the nacho base
- 250 g sturdy corn tortilla chips
- 1 1/2 cups shredded Monterey Jack cheese
- 1 cup shredded sharp cheddar cheese
- 3/4 cup cooked black beans, drained and rinsed
- 1/2 cup cooked corn kernels
- 1/2 teaspoon ground cumin
- 1/4 teaspoon smoked paprika
- 1 small pinch fine sea salt
- 1 tablespoon pickled jalapeño slices, plus more to taste
For finishing
- 1/2 cup diced ripe tomato or pico de gallo
- 1 small avocado, diced
- 1/4 cup sour cream or Mexican crema
- 2 tablespoons finely chopped red onion
- 2 tablespoons fresh cilantro leaves
- 1 lime, cut into wedges
- Hot sauce, optional
Kitchen Tools
- Rimmed baking sheet or ovenproof platter
- Parchment paper, optional
- Small bowl
- Cheese grater, if grating cheese fresh
- Spoon for scattering toppings
- Sharp knife and cutting board
Preparation
Seasoning the warm toppings
- Build flavor quickly: In a small bowl, combine the black beans, corn, cumin, smoked paprika, and a small pinch of salt. This simple seasoning gives the nachos depth without requiring a separate pan or long cooking time. Keep the mixture fairly dry; excess moisture is the enemy of crisp chips.
Layering the nachos intelligently
- Start with structure: Spread half the tortilla chips across a rimmed baking sheet in a loose, even layer. Avoid piling them too high at the beginning. A flatter base gives the heat room to circulate and helps the cheese melt evenly.
- Scatter half the shredded cheeses directly over the chips before adding any beans or vegetables. This is the smarter order: cheese first, toppings second. As it melts, the cheese clings to the chips and creates a light protective layer that keeps the base crisp.
- Add half the seasoned beans and corn, then a few pickled jalapeño slices. Repeat with the remaining chips, cheese, beans, corn, and jalapeños. Keep the top layer generous with cheese so the platter comes out glossy, molten, and cohesive.
Baking until crisp and melty
- Place the tray under a hot broiler or in a very hot oven at 220°C for about 5 to 6 minutes, just until the cheese is fully melted and bubbling in places. Watch closely, as tortilla chips can move from golden to scorched quickly.
- Texture check: The best loaded nachos should have warm toppings, melted cheese, and visible crisp edges. Remove the tray as soon as the cheese has relaxed into the chips. Do not wait for every chip to brown; the residual heat will continue to soften the cheese slightly.
Finishing with fresh toppings
- Immediately spoon over the diced tomato or pico de gallo, followed by the avocado, red onion, and cilantro. Add the sour cream in small spoonfuls rather than one heavy mound, so each section of the platter gets a little cool creaminess.
- Tip: Finish with lime wedges at the table rather than squeezing lime over the whole tray too early. The acidity is essential, but adding it at the last moment preserves the chips’ crunch.
Serving Suggestions
Serve loaded nachos immediately, while the cheese is still soft and the chips are audibly crisp. I like presenting them directly on the warm tray, with the toppings scattered in a way that feels abundant but not chaotic. A few cilantro leaves, a final spoonful of crema, and bright lime wedges make the platter look fresh rather than heavy.
For a more substantial meal, pair them with grilled chicken, shredded beef, or a bowl of chili on the side rather than overloading the tray itself. Nachos are at their best when each chip remains liftable. For drinks, choose something sharp and refreshing: sparkling lime water, a citrusy iced tea, or a crisp lager if the occasion calls for it.
Chef Tips
Choose sturdy chips
Thin chips may be pleasant for salsa, but they rarely survive a proper nacho build. Look for thick corn tortilla chips with enough strength to hold cheese and beans. Their deeper corn flavor also stands up beautifully to smoke, spice, and acidity.
Grate the cheese yourself
Pre-shredded cheese is convenient, but freshly grated cheese melts more smoothly. Monterey Jack brings softness and stretch, while sharp cheddar adds flavor. The blend matters: one cheese for melt, one cheese for character.
Keep wet toppings for the finish
Tomatoes, crema, avocado, salsa, and lime should go on after baking. This keeps the chips crisp and gives the final dish contrast. Warm, melted, salty elements need cool freshness to feel complete.

Use restraint with toppings
The temptation with loaded nachos is to keep adding more. A chef’s approach is more deliberate. Every topping should improve the bite, not bury the chips. If you want extra salsa, guacamole, or sour cream, serve them alongside.
Storage and Make-Ahead Tips
Nachos are best eaten the moment they are made. Once dressed, the chips will gradually soften, especially under tomatoes, crema, and avocado. If you do have leftovers, store them in an airtight container in the refrigerator for up to one day, knowing the texture will be softer when reheated.
To reheat, place the nachos on a baking sheet and warm them in a hot oven for 4 to 5 minutes. Avoid the microwave, which makes the chips leathery. For make-ahead ease, shred the cheese, season the beans and corn, chop the onion, and prepare the garnishes in advance. Assemble and bake only when ready to serve.
Additional Information
Nachos began as a practical, spirited dish in northern Mexico, famously created from what was available: tortillas, cheese, and pickled jalapeños. Over time, they became a Tex-Mex classic, endlessly adaptable and deeply tied to gatherings, sports nights, casual parties, and late-evening cravings.
What I love about this version is that it respects the original simplicity while making the structure more precise. The smarter layering is not fussy; it is functional. Cheese protects, heat melts, fresh toppings lift, and lime sharpens everything at the end. In ten minutes, you have a platter that feels generous, lively, and carefully considered without ever losing the easy pleasure that makes nachos beloved.
